> Login to the WP-Admin dashboard.
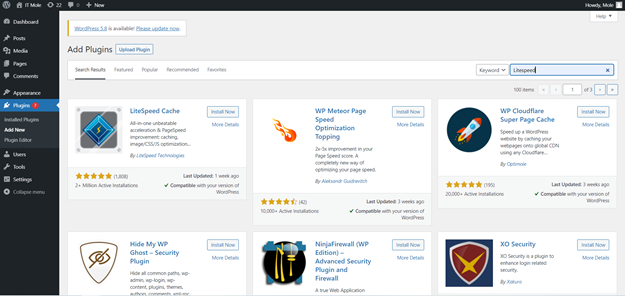
> Access "Plugins" section and select "Add New" option. Search and install LiteSpeed Cache plugin that looks like in the picture below:
I installed and activated the LiteSpeed Cache plugin for WordPress. Now what are we doing?
Well, it is not enough just to install and activate it. It must also be configured. There are no default settings for all sites. The settings must be made for each website individually.
After installation, the settings of the plugin will be displayed in the lower left page (in the sidebar):

For the beginning if you are not an expert in WordPress or if you have not worked with Cache plugins, we recommend that you will only go to the tab called "Cache" which looks like this:
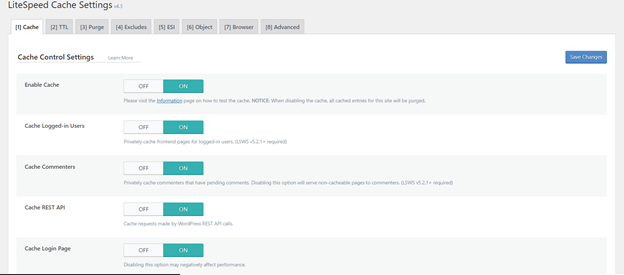
By default, all cache options are enabled. This can cause errors on the website: it can distort pictures, hide certain sidebars, delete icons, and so on.
To test your site's settings and site speed, we recommend using the Google services, PageSpeed here is the link: https://pagespeed.web.dev/
Below is a small summary of all options in the Cache tab.
>Cache
The first option on the Cache tab turns the caching functionality on and off. The remaining settings allow you to decide what types of content will be cached. By default, everything is enabled. If you don’t know what these settings do, it’s best to leave them set to their defaults.
>TTL
TTL stands for “Time to Live” and it refers to the number of seconds a page can remain in cache before it is considered stale. Once a page reaches its TTL, it is purged from cache. We’ve chosen default TTLs that should work for most sites, but you are free to change them.
>Purge
There are sometimes situations where pages should be purged before their natural expiration. This section allows you to define the rules for that behavior. The default selections should work for most sites, but you can change them if you need to.
>Excludes
You may have pages that you don’t want cached at all. These options allow you to exclude specific parts of your site from being cached. Again, for most sites, there will be no need to change these settings. They are provided to allow you to make custom exceptions to the cache rules.
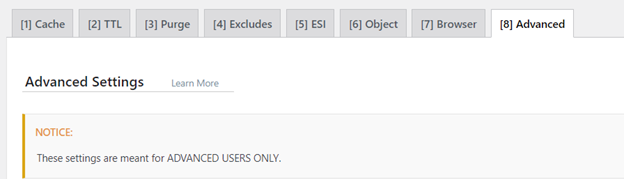
For the other extensions: ESI, Object, Browser, Advanced, we recommend that you do not modify them unless you have detailed knowledge in this area. As indicated on the Advanced page:
Other sections of the plugin:
There are several sections in the LSCache plugin.
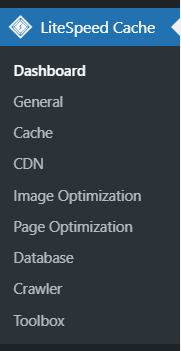
>Dashboard
The LiteSpeed Cache Dashboard allows you to see the status of all of your LSCache and QUIC.cloud services (Image Optimization, Critical CSS Generation, Low-Quality Image Placeholders, Cache Crawler, etc.) at a glance.
>General
The settings in this section control your usage of QUIC.cloud services, the ability to auto upgrade the plugin, and which messages you want to have displayed on the dashboard.
>CDN
This section allows you to configure your Content Delivery Network for use with WordPress. If you don’t use a CDN, don’t worry about it. We’ve left CDN support disabled by default.
>Image Optimization
LiteSpeed Cache for WordPress provides the ability to optimize your images, making them smaller, and faster to transmit. This is done through a QUIC.cloud service and can be controlled in this section of the plugin.
>Page Optimization
There are several non-cache measures you can take to speed up your WordPress site, and many of them are supported in this tab. CSS and Javascript minification and combination, HTTP/2 push, asynchronous and deferred load… if you don’t know what these things mean, don’t worry. We’ve left them disabled by default.
>Database
This section allows you to optimize your WordPress database. Database optimization is a useful tool when it comes to speeding up your site. LSCWP’s DB Optimizer gives you an easy way to execute some of these tasks in your WordPress database.
>Crawler
We’ve disabled the crawler by default. When it’s active, it travels your site, refreshing any pages that may have expired from the cache. Crawling can be a resource-intensive process, and not all hosting providers will allow its use. If your hosting provider does allow crawling, it’s a nice way to keep your cache fresh.
>Toolbox
When you need to manually purge the cache, export your site settings, or debug an issue, you’ll find the means in the Toolbox section. Probably the most useful thing you will find here is the Environment Report. If you are having a problem and LiteSpeed support asks for your Report Number, this is where you would go to get it.
